The performance, reliability, and longevity of machinery are fundamentally tied to the precision of its components. For rolling bearings, this precision is defined by a comprehensive system of tolerances that govern their physical dimensions and geometric accuracy. The world of tolerances is typically categorized into four main types: Size, Form, Orientation, and Location.
In the context of rolling bearings, the most critical are Size Tolerances and Form Tolerances. This guide will provide a detailed look at these critical parameters, drawing from international standards such as ISO 199 and ISO 492.

The Foundation – Understanding Bearing Tolerance Grades (ABEC/ISO)
Bearing precision is classified by a grading system, most commonly the American ABEC (Annular Bearing Engineering Committee) standard, which corresponds to the international ISO P-grade system. As the number in the grade increases, so does the bearing’s precision, which is defined by a decrease in its manufacturing tolerance values.
Here is a breakdown of the common ABEC/ISO tolerance grades and their typical applications:
| Grade (ISO/ABEC) | Description | Precision Level | Typical Applications |
| P0 / ABEC-1 | Standard Grade | Low | General industrial machinery, automotive parts, home appliances, and applications with low-to-moderate speed requirements. This is the most widely used and cost-effective grade. |
| P6 / ABEC-3 | Higher Precision | Medium | Electric motors, power tools, and other applications requiring improved rotational accuracy and stability compared to standard P0 bearings. |
| P5 / ABEC-5 | High Precision | High | Machine tools, printing presses, and high-speed pumps where rotational accuracy and quiet operation are critical. |
| P4 / ABEC-7 | Very High Precision | Very High | Precision spindles, aerospace, and advanced robotics, where the demands for rotational accuracy and performance at very high speeds are extremely strict. |
| P2 / ABEC-9 | Ultra-Precision | Ultra-High | Military equipment, gyroscopes, and other specialized applications that require the highest possible level of accuracy and minimal runout. |
Dimensional Tolerances – The Language of Bearing Dimensions
Dimensional tolerances define a bearing’s physical size and shape, ensuring a proper fit with the shaft and housing. These tolerances are controlled by specific parameters that dictate the deviation from nominal dimensions.
Δdmp (Mean Bore Diameter Deviation):
- This is the difference between the average measured bore diameter and the nominal diameter.
- The table shows a tolerance range from
0to a negative value (indicated by a-). This means the average bore diameter must be less than or equal to the nominal size. - Why it matters: This is a crucial parameter for achieving an interference fit with a shaft, ensuring the inner ring sits tightly and prevents rotational slip.
Vdp (Bore Diameter Variation):
- This measures the difference between the largest and smallest diameters measured within a single radial plane.
- It is a direct indicator of the roundness of the bearing bore.
- The table provides different maximum values for various Diameter series (
9,0, 1, and2, 3, 4). These series numbers often correspond to different bearing types (e.g., light vs. heavy series) and reflect different manufacturing requirements.
Vdmp (Mean Bore Diameter Variation):
- This measures the difference between the maximum and minimum mean bore diameters measured in different radial planes.
- It is an indicator of the cylindricity of the bore.
- Why it matters: A low
Vdmpensures that the bore is a true cylinder, preventing improper seating and uneven stress distribution along the shaft.
These parameters are often accompanied by GPS modifiers, such as
LP for two-point sizes, SD for average sizes, and ACS for arbitrary cross-sections, which specify the precise measurement method.
| Symbol | Definition | What it Measures | GPS Modifiers |
| d mm | Nominal Bore Diameter | The reference size for all inner ring tolerances. | – |
| D mm | Nominal Outer Diameter | The reference size for all outer ring tolerances. | – |
| Δdmp | Mean bore diameter deviation | The difference between the average measured bore diameter and the nominal size. This controls the interference fit on the shaft. | SD (Average Size) |
| Vdp / Vdsp | Bore diameter variation | The range of diameter measurements within a single cross-section, which indicates the roundness of the bore. | SR (Size Range), ACS (Arbitrary Cross-section) |
| Vdmp | Mean bore diameter variation | The range of average diameters across different cross-sections, which indicates the cylindricity of the bore. | SD (Average Size), ACS (Arbitrary Cross-section), SR (Size Range) |
| ΔBs | Inner ring width deviation | The difference between the measured width and the nominal width, important for axial positioning. | LP (Two-point size), GN (Minimum circumscribed size) |
| VBs | Inner ring width variation | The range of width measurements, which indicates the parallelism of the ring faces. | LP (Two-point size), SR (Size Range) |
Form and Position Tolerances – Defining Rotational Accuracy
Form and position tolerances, also known as geometric tolerances, are crucial for a bearing’s dynamic performance and are often the deciding factor in high-speed applications.
- Radial Runout: This is a core parameter for rotational accuracy. The inner ring radial runout,
Kia, measures the eccentricity between the inner ring bore and its raceway relative to a datum defined by the outer ring’s outer surface. A lowerKiavalue directly corresponds to higher rotational accuracy, reduced vibration, and lower noise. Similarly,Keameasures the outer ring’s radial runout. - Axial Runout: This measures the perpendicularity of the ring faces to the bearing’s axis. The inner ring face axial runout,
Sd, measures the axial movement of the inner ring face relative to its bore axis. For a complete bearing,SiaandSeameasure the axial runout of the inner and outer ring faces, respectively. It is important to note that certain bearing types, such as cylindrical roller bearings (CRB), do not have axial runout tolerances. - Perpendicularity: The perpendicularity of the outer ring’s outer surface axis relative to a datum defined by its end face is specified by the
SDtolerance.
GPS Modifiers and Their Meanings
Inner Ring Dimensions
- Deviation of taper (ΔSL): The deviation of the inner ring’s taper from its nominal size.
- Nominal inner ring width (B): The target width of the inner ring.
- Deviation of inner ring width (ΔBS): For a symmetrical ring, this is the deviation of the two-point width measurement from the nominal size. For an asymmetrical ring, the upper limit is the deviation of the minimum circumscribed dimension from the nominal size, while the lower limit is the deviation of the two-point measurement.
- Range of inner ring width (VBS): For a symmetrical ring, this is the range of the two-point width measurements. For an asymmetrical ring, it is the range of the minimum circumscribed dimensions obtained from any longitudinal section.
- Nominal bore diameter (d): The nominal inner diameter of a cylindrical or tapered bore at the theoretical small end.
- Deviation of inner diameter (Δdmp): For a cylindrical bore, this is the deviation of the average diameter from the nominal size in any section. For a tapered bore, it is the deviation of the average diameter at the theoretical small end from the nominal size.
- Range of inner diameter (Vdmp): This is the range of the average diameter measurements obtained from any section of a cylindrical bore.
- Deviation of two-point bore diameter (Δds): The deviation of the two-point bore measurement from its nominal size for a cylindrical bore.
- Range of two-point bore diameter (Vdsp): The range of two-point diameter measurements in any section of a cylindrical or tapered bore.
- Tapered bore dimensions:
- Nominal large end diameter (d1): The nominal diameter of the theoretical large end.
- Deviation of large end diameter (Δd1mp): The deviation of the average diameter at the theoretical large end from its nominal size.
- Taper (SL): The difference between the nominal diameters of the large and small ends (d1−d).
Outer Ring Dimensions
- Nominal outer ring width (C): The target width of the outer ring.
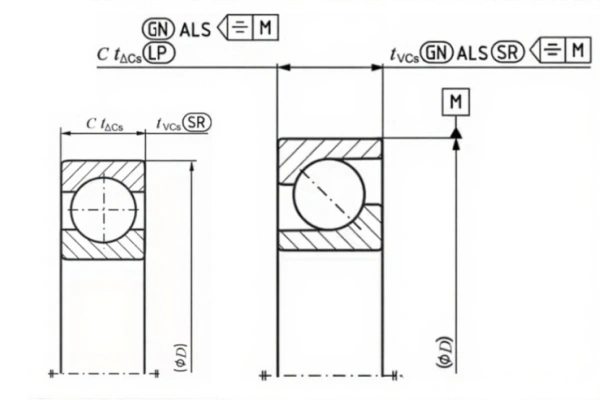
- Deviation of outer ring width (ΔCS): For a symmetrical ring, this is the deviation of the two-point width measurement from the nominal size. For an asymmetrical ring, the upper limit is the deviation of the minimum circumscribed dimension from the nominal size, and the lower limit is the deviation of the two-point measurement.
- Range of outer ring width (VCS): For a symmetrical ring, this is the range of the two-point width measurements. For an asymmetrical ring, it is the range of the minimum circumscribed dimensions obtained from any longitudinal section.
- Nominal outer diameter (D): The target outer diameter.
- Deviation of outer diameter (ΔDmp): The deviation of the average diameter from the nominal size in any section.
- Range of outer diameter (VDmp): The range of the average diameter measurements obtained from any section.
- Deviation of two-point outer diameter (ΔDs): The deviation of the outer diameter’s two-point measurement from its nominal size.
- Range of two-point outer diameter (VDsp): The range of two-point diameter measurements in any section.
Complete Bearing Dimensions
- Nominal width (T): The nominal width of the complete bearing.
- Deviation of width (ΔTS): The deviation of the minimum circumscribed width of the complete bearing from its nominal size.
- Nominal effective widths (T1, T2): T1 is for the inner assembly with a standard outer ring, and T2 is for the outer ring with a standard inner assembly.
- Deviation of effective widths (ΔT1S, ΔT2S): These are the deviations of the minimum circumscribed effective widths from their nominal sizes.
GPS Modifiers and Their Meanings
GPS modifiers provide crucial context for how a tolerance is measured and evaluated.
- Two-point size (LP): The distance between two opposing points on a size feature, such as a two-point diameter on a cylindrical surface.
- Average size (SD): A statistical size obtained by averaging the maximum and minimum local sizes measured on the feature.
- Size range (SR): The difference between the maximum and minimum local sizes of a feature.
- Minimum circumscribed size (GN): The size of a fitting feature determined by a minimum circumscribed criterion.
- Any section (ACS): The tolerance applies to any section of the size feature, not just a specific one.
- Specific section (SCS): The tolerance applies to a designated section of the feature, whose position is defined by a dimension.
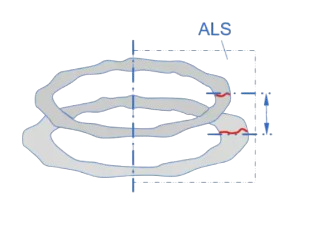
- Any longitudinal section (ALS): The tolerance applies to any longitudinal section of the feature.
The Practical Connection: From Theory to Application
Let’s illustrate these concepts with examples, using a standard grade bearing with a nominal inner diameter of d=50 mm.
Inner Diameter Tolerance Check
- Standard Grade: For standard grade bearings, the Δdmp (average size deviation) value is used for tolerance checks, while for precision grades like P4 and P2, Δds (two-point size deviation) is used.
- Deviation of Average Diameter (Δdmp): The standard for a d=50 mm bearing requires the average size deviation to be between 0 and -12 μm. An example calculation shows a value of -12 μm, which is on the limit and thus meets the requirement.
- Range of Average Diameter (Vdmp): The standard for a d=50 mm bearing requires a range of Vdmp=9μm. An example calculation of the range of the average size deviations results in a value of 12, which does not meet the requirement.
Inner Ring Width Tolerance Check
- Symmetrical Inner Ring: For a standard grade bearing, the deviation of the two-point width measurement (ΔBS) must be between 0 and -120 μm. A set of example measurements fall within this range, meeting the requirement. The range of two-point widths (VBS) is required to be 20μm. A calculation shows a range of 20μm, which also meets the requirement.
- Asymmetrical Inner Ring: For a standard grade bearing, the deviation of the minimum circumscribed width (ΔBS) is required to be between 0 and -120 μm. Example measurements confirm this requirement is met. The range of minimum circumscribed widths (VBS) is required to be 20μm. An example calculation of the range results in 7μm, which meets the requirement.
Examples of Bearing Dimensional Tolerances (Bore and Outer Diameter are Similar)
Checking the inner diameter size tolerance for a standard grade 7310 bearing with a nominal bore diameter of d=50 mm.
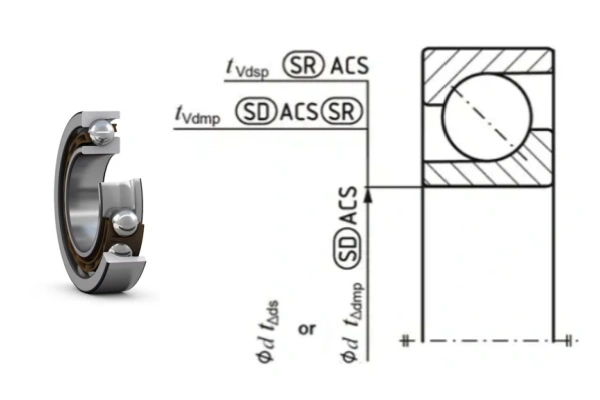
- For precision grades P4 and P2, the tolerance check uses the nominal diameter deviation Δds based on two-point measurements.
- For standard grade, P6, and P5 tolerances, the check uses the nominal diameter deviation Δdmp based on average sizes.
Deviation of Two-Point Measurements in Any Section (Δds): This is not checked for standard grade bearings. However, if it were a P4 precision bearing, the requirement for Δds is between 0 and −6μm. In the provided example data, some sections fall outside this range.
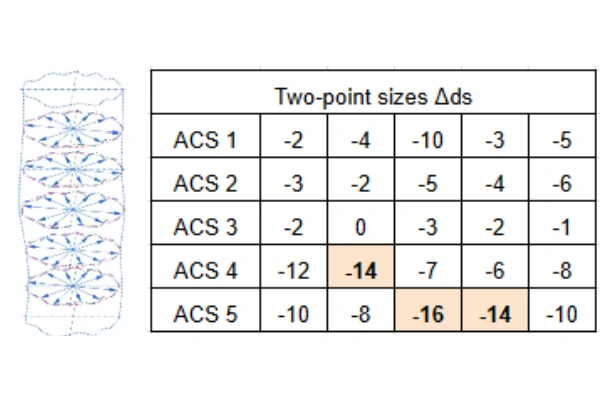
Range of Inner Diameter Two-Point Measurements in Any Section (Vdsp): The formula is Vdsp=Δdsp_max−Δdsp_min. According to the standard for d=50 mm, the tolerance is Vdsp=9μm. The example data shows values that meet this requirement.
| Two-point sizes Δdsp | Vdsp (SR ACS) | |||||
| ACS 1 | -2 | -4 | -10 | -3 | -5 | 8 |
| ACS 2 | -3 | -2 | -5 | -4 | -6 | 4 |
| ACS 3 | +3 | 0 | -3 | -2 | +1 | 6 |
| ACS 4 | -12 | -14 | -7 | -6 | -8 | 8 |
| ACS 5 | -10 | -8 | -16 | -14 | -10 | 8 |
Deviation of Inner Diameter Average Size in Any Section (Δdmp): The formula is Δdmp=(Δdsp_max+Δdsp_min)/2. For a standard grade bearing with d=50 mm, the standard specifies an upper limit of 0 and a lower limit of 12 for Δdmp. The example data meets this requirement.
| Two-point sizes Δdsp | Δdmp (SD ACS) | |||||
| ACS 1 | -2 | -4 | -10 | -3 | -5 | -6 |
| ACS 2 | -3 | -2 | -5 | -4 | -6 | -4 |
| ACS 3 | +3 | 0 | -3 | -2 | +1 | 0 |
| ACS 4 | -12 | -14 | -7 | -6 | -8 | -10 |
| ACS 5 | -10 | -8 | -16 | -14 | -10 | -12 |
Range of Inner Diameter Average Size in Any Section (Vdmp): The formula is Vdmp=Δdmp_max−Δdmp_min. For a standard grade bearing with d=50 mm, the standard is Vdmp=9μm. The example data does not meet this requirement.
| Two-point sizes Δdsp | Δdmp (SD ACS) | Vdmp (SD ACS) (SR) | |||||
| ACS 1 | -2 | -4 | -10 | -3 | -5 | -6 | 12 |
| ACS 2 | -3 | -2 | -5 | -4 | -6 | -4 | |
| ACS 3 | +3 | 0 | -3 | -2 | +1 | 0 | |
| ACS 4 | -12 | -14 | -7 | -6 | -8 | -10 | |
| ACS 5 | -10 | -8 | -16 | -14 | -10 | -12 | |
Examples of Bearing Dimensional Tolerances (Inner Ring Width, Outer Ring Width is Similar)
Checking the width size tolerance for a symmetrical inner ring bearing (6310) of standard precision grade with a nominal bore diameter of d=50 mm.
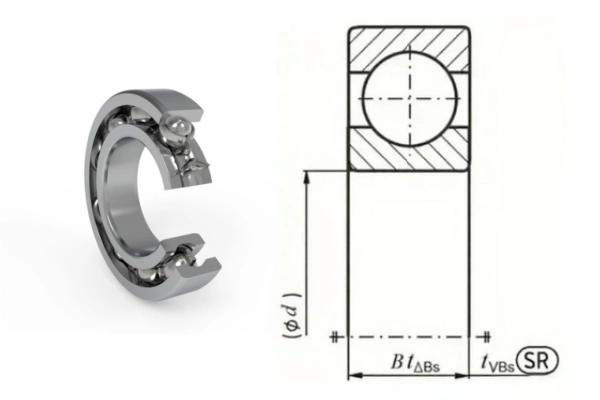
Inner Ring Width Two-Point Distance Deviation (ΔBS): For a standard grade bearing, the specification requires ΔBS to be between 0 and −120μm. The example data is within this range and therefore meets the requirement.
| Two-point sizes ΔBS | ||||
| -20 | -40 | -35 | -37 | -25 |
| -32 | -21 | -38 | -40 | -26 |
| -28 | -25 | -32 | -27 | -40 |
| -22 | -20 | -35 | -24 | -33 |
| -29 | -38 | -26 | -39 | -38 |
Inner Ring Width Two-Point Distance Range (VBS): The formula is VBS=ΔBS_max−ΔBS_min. For a standard grade bearing, the standard requirement is VBS=20μm. In this example, the calculation is VBS=−20−(−40)=20μm, which meets the requirement.
| Two-point sizes ΔBS | VBS (SR) | ||||
| -20 | -38 | -37 | -35 | -25 | 20 |
| -32 | -21 | -38 | -36 | -26 | |
| -28 | -25 | -32 | -27 | -40 | |
| -22 | -21 | -35 | -24 | -33 | |
| -29 | -38 | -26 | -39 | -38 | |
Example: Checking the width size tolerance for an asymmetrical inner ring bearing (7310) of standard precision grade with a nominal bore diameter of d=50 mm.
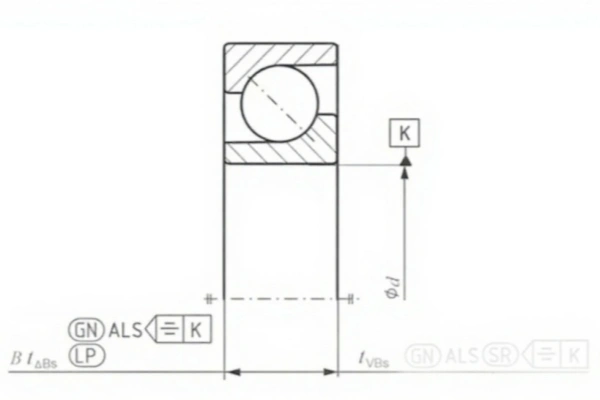
Deviation of Inner Ring Width Minimum Circumscribed Size in Any Section (ΔBS): For a standard grade bearing, the specification requires ΔBS to be between 0 and −120μm. The example data meets this requirement.
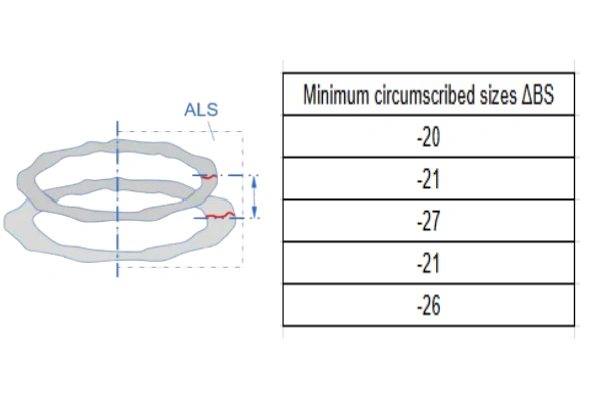
Range of Inner Ring Width Minimum Circumscribed Size in Any Section (VBS): The formula is VBS=ΔBS_max−ΔBS_min. For a standard grade bearing, the specification requires VBS=20μm. In this example, the calculation is VBS=−27−(−20)=7μm, which meets the requirement.
| Minimum circumscribed sizes ΔBS | VBS (GN ALS SR) |
| -20 | 7 |
| -21 | |
| -27 | |
| -21 | |
| -26 |
The tolerance for the outer ring width is understood similarly to that of the inner ring.
Conclusion
A thorough understanding of bearing drawing precision grades and tolerance ranges is essential for proper bearing selection and reliable equipment operation. By correctly interpreting the symbols and modifiers, engineers can ensure that the chosen bearings meet the necessary dimensional and geometric specifications for their applications. This knowledge is especially critical for high-precision or custom-designed bearings. A complete bearing drawing is a complex document, but breaking it down into these key elements makes it understandable and actionable.
For reliable and high-precision bearings that meet the most demanding specifications, choose TFL Bearings. Our commitment to manufacturing excellence ensures that every TFL bearing is produced with meticulous attention to detail and adherence to international tolerance standards. When you require bearings that you can trust to perform consistently, you can depend on TFL Bearings to deliver the quality and precision your application demands.


