For bearings to last a long time and be used effectively, proper installation is essential. In addition to causing bearing damage, improper usage and use of installation equipment can significantly impair machine performance.
Bearings eventually need to be maintained or replaced because of damage after a certain amount of use. How to properly dismount bearings without damaging them or other parts is one of the challenges in bearing maintenance.
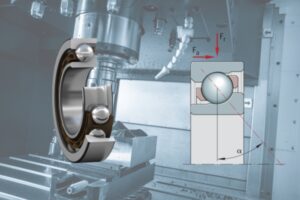
Deep groove ball bearings have a wide range of applications. Therefore, this guide uses deep groove ball bearings as an example to demonstrate how to correctly install and dismount ball bearings.
A deep groove ball bearing
Deep Groove Ball Bearing Installation Methods
Deep groove ball bearings primarily have two installation methods. The main difference between them lies in whether the bearing or related parts are heated.
Cold Installation Method
The cold installation method is suitable for small and medium-sized bearings with small interference fits. The basic principle of this method is to apply external pressure or striking force to overcome the interference fit, forcibly pressing or tapping the bearing onto the shaft journal or into the bearing housing bore.
Tapping Method
The tapping method involves manually tapping the bearing onto the shaft or into the housing bore using relatively simple tools. Generally, we need an installation sleeve and a hammer to complete the installation. A soft hammer/rubber mallet/wooden mallet is preferred. Directly striking with a hard steel hammer is not recommended as it may damage the sleeve or cause splashing.
When installing bearings, one customer has used the copper rod tapping method, which easily caused uneven axial force on the bearing, leading to cage deformation, rolling element damage, and increased clearance. Additionally, copper particles from the rod can fly into the bearing cage during tapping, potentially causing bearing failure.
Bearing damage caused by an operational error
After preparation, securely place the sleeve on the end face of the bearing’s inner ring, ensuring the sleeve’s striking face fully aligns with the inner ring’s end face for uniform force distribution. Then, holding a soft hammer, strike the end face of the installation sleeve evenly, rhythmically, and with moderate force. Caution! Never strike the bearing body directly!
During tapping, maintain the perpendicularity of the bearing to the shaft, allowing the bearing to move smoothly along the shaft journal. Avoid forceful tapping, striking only one side of the sleeve (which can cause the bearing to skew or seize), or tilting the bearing during the tapping process.
tapping method
Pressing Method
The pressing method utilizes specialized tools (such as a press) to apply mechanical pressure to the bearing, pressing it into place. Compared to manual tapping, the pressing method applies more stable and uniform pressure, significantly improving accuracy.
A specialized press head/press sleeve is crucial! The press head connects to the press ram and directly contacts the bearing. Its function is similar to the installation sleeve in the tapping method, ensuring uniform pressure is applied to the entire end face of the bearing’s fitted ring. During the pressing process, if any signs of bearing skewing are observed, stop immediately, adjust, and reapply pressure.
Hot Installation Method
The hot installation method is an installation method that involves heating the bearing or bearing housing to transform a tight fit into a loose fit through thermal expansion. It is a common and labor-saving installation method, suitable for installing bearings with larger interference fits.
Metals expand when heated. After heating the bearing, its inner diameter increases, reducing fitting resistance, allowing it to slide onto the shaft without stress or damage. After natural cooling, the bearing contracts, forming a tight interference fit. This method avoids damage to the bearing caused by direct force and is one of the preferred methods for installing medium to large bearings.
hot installation method
Comparison of Ball Bearing Heating Methods
Heating Method
Description
Advantages
Disadvantages
Induction Heater (Recommended)
Electromagnetic induction
Fast, uniform heating; clean, safe; precise temperature control
High equipment cost
Oil Bath Heating
Placing bearings in 80-100°C industrial oil
Uniform heating; low cost
Prone to contamination; fire risk
Hot Air Circulation Oven
Hot air convection heating
Uniform; safe
Slow heating speed
Open Flame/Electric Heater
Not recommended, easily burns bearings
–
Uneven heating; damages bearings
Bearings are typically heated to 80°C to 100°C. In most cases, this temperature is sufficient to expand the bearing’s inner diameter enough for easy installation. Generally, the temperature should not exceed 120°C. Excessive temperatures can lead to structural changes in the bearing material or lubricant failure. Additionally, some special bearings (such as those with special cages, seals, or grease) may have stricter temperature limitations, and the manufacturer’s data should be consulted.
Precautions for Deep Groove Ball Bearings
Use Specialized Bearing Installation and Dismounting Tools
After determining the required installation method for the bearing, we need to first prepare conventional tools and specialized bearing installation tools. Professional bearing installation tools ensure that the installation force is applied uniformly to the inner or outer ring of the bearing, avoiding bearing damage caused by improper tools and operations during installation.
Pre-installation Bearing Inspection
For used bearings, check the surface of the rolling elements (balls/rollers) for burrs, scratches, or cracks. Verify if the radial clearance and axial play of the used bearing are within acceptable limits; generally, only radial clearance is measured. For new bearings, first check if the bearing model is correct. For example, for a 6318 deep groove ball bearing, the inner diameter is 90mm, and its radial clearance range is 0.016 to 0.046mm. The maximum wear limit can also be found (e.g., 0.25mm).
Use measuring tools (calipers, bore gauges, outside micrometers) to confirm that the tolerance grades of the shaft and housing bore meet the requirements (commonly H7/k6, H7/n6, etc.). An improper fit can cause the bearing to be too tight or too loose, leading to failure.
Then perform a visual inspection. Check if the bearing packaging is intact and if the bearing body has any visible damage such as rust, cracks, dents, or nicks. Carefully and gently rotate the bearing to feel for any sticking or abnormal noises. Be careful not to over-rotate, especially pre-lubricated bearings, to avoid disturbing the internal grease.
The bearing, shaft, and bearing housing must be thoroughly cleaned. Remove old grease, rust, metal shavings, dust, and moisture from the shaft journal, bearing housing bore, and bearing cap. Even small dust particles or metal chips entering the bearing can cause wear to the raceway and rolling elements during operation, leading to premature bearing failure.
Precautions During Installation
Correct Force Application
Force must only be applied to the fitted ring (installing inner ring on shaft → press inner ring; installing outer ring in housing bore → press outer ring).
Strictly prohibit transmitting force through the rolling elements, as this will cause raceway indentations and severely impact lifespan.
Avoid Bearing Tilting
During initial installation, maintain coaxial alignment; do not force a skewed installation.
Guiding tools or slight rotation can assist in alignment.
Avoid Bearing Tilting
Control Installation Temperature (if hot mounting)
Heating temperature should not exceed 120°C.
Heating must be uniform; induction heaters or hot air ovens are recommended.
Prohibited to use open flames or electric ovens for heating.
Moderate Installation Speed
Especially for hot mounting, install quickly immediately after heating to prevent cooling and seizing.
When pressing during cold installation, apply slow and even force to avoid impact.
Post-Installation Inspection Precautions
Visual Inspection: Confirm that the bearing is installed in place, not skewed, and in tight contact with the shaft shoulder or bearing housing shoulder.
Rotation Inspection: Rotate the bearing or related components by hand to feel if the rotation is smooth and free, without abnormal noise or resistance.
Preload Inspection (if needed): For some bearings requiring preload adjustment, adjust according to specifications. Deep groove ball bearings usually have built-in clearance, but after installation, ensure their axial and radial clearance meets standards.
Sufficient Lubrication: Check if the bearing needs additional grease or oil as per equipment requirements. Pre-lubricated sealed bearings do not require re-greasing.
Marking and Recording: Record installation time, model, batch, etc., for future maintenance management.
Dismounting Methods
Puller Method (Most Common)
Applicable Scenarios: Small to medium-sized bearings where surrounding space allows for puller operation.
Tools: Three-jaw puller, hydraulic puller.
Operating Essentials:
Securely grip the bearing inner ring (or outer ring, as required by force application) with the puller jaws.
Slowly and evenly rotate the handle to apply pulling force, avoiding eccentric loading.
If the fit is tight, a hot air gun can be used to locally heat the bearing inner ring to assist in dismounting using the principle of thermal expansion, which will be more efficient.
bearing dismounting tool: three clamp puller
Heating Method (For Interference Fits)
Principle: Utilizes the thermal expansion and contraction properties of metal. By heating the bearing (or bearing housing), the fit clearance is increased, facilitating dismounting.
Tools: Induction heater (recommended, for uniform and controllable heating), hot air gun, insulated gloves.
Operating Essentials:
Evenly heat the bearing outer ring to the recommended temperature (usually between 150-200°C, refer to the bearing manufacturer’s guide for specifics).
After heating, quickly dismount using a puller or other auxiliary tools.
Caution: Always wear protective gear, such as insulated gloves, to prevent burns during operation.
Hydraulic Method (Preferred for Heavy Bearings)
Applicable Scenarios: Large or heavy bearings, especially those with very tight interference fits.
Tools: Hydraulic jack with specialized support frame.
Operating Essentials:
The applied pressure must be perpendicular to the bearing axis, ensuring uniform force distribution.
A small amount of lubricant can be applied to the bearing and shaft mating surfaces to reduce friction and facilitate smoother dismounting.
Strictly control the hydraulic jack’s pressure value, not exceeding the equipment or bearing’s load limit.
Tapping Method (Emergency Use)
Applicable Scenarios: For use in the absence of specialized tools or in emergency situations; not recommended as a regular method.
When tapping, the force points should be evenly and symmetrically distributed on the inner or outer ring of the bearing, avoiding excessive single-point force that could cause the bearing to tilt and seize or be damaged.
Strictly prohibited to directly hammer the bearing’s rolling elements or cage; this will directly scrap the bearing.
Pad the area beneath the bearing with a wooden block or support to prevent shaft deformation or damage during tapping.
Pushing Out Method (Shaft End with Threaded Hole)
Applicable Scenarios: The shaft end is designed with a threaded hole, allowing the bearing to be pushed out using bolts.
Operating Essentials:
First, thoroughly clean the threaded hole, ensuring no impurities, and apply a small amount of lubricant to facilitate bolt insertion.
Install the push-out bolts and a specialized support plate; the support plate should uniformly act on the bearing inner ring.
Alternately and slowly tighten each bolt, allowing the bearing to be pushed out smoothly, avoiding uneven force that could cause seizing.
Destructive Dismounting (Last Resort)
Applicable Scenarios: Bearings that are completely seized and cannot be dismounted by other methods, and have no salvage value (i.e., confirmed to be scrapped).
Operating Essentials:
An angle grinder can be used to cut the bearing outer ring, but extreme caution is required to avoid damaging the shaft or bearing housing.
In extreme cases, oxygen-acetylene flame cutting can be considered for local melting, but this produces high temperatures and fumes and has potential to damage surrounding components, so extreme care is essential.
Pay special attention to protecting adjacent components to avoid secondary damage during cutting or melting.
Caution! Any operation must prioritize safety, and bearing dismounting is no exception. Bearings may experience some wear towards the end of their service life. In such cases, improper dismounting methods or unreasonable external force application can easily lead to bearing fragmentation, causing metal shards to fly and posing a danger. It is strongly recommended to always wear safety glasses, gloves, and other personal protective equipment during bearing dismounting operations to ensure safety.
Conclusion
Mounting and dismounting deep groove ball bearings requires correct methods and tools to avoid damage to the bearings or surrounding components and to ensure the safety of operators. We must always remember that preventive maintenance is far more economical and efficient than reactive remedies.
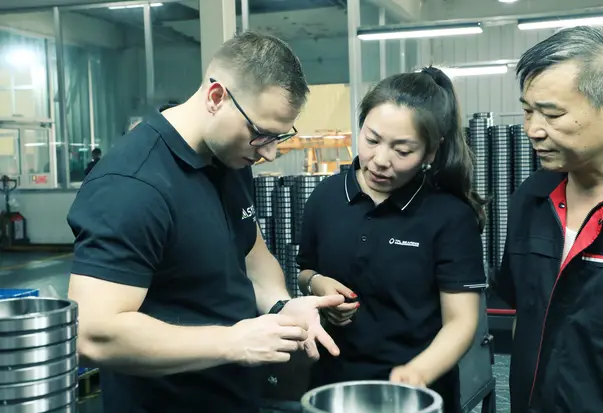
TFL Bearing always adheres to the philosophy of “ensuring equipment safety with quality and earning customer trust with professional service,” providing you with stable, durable, and cost-effective deep groove ball bearing products. We can offer you one-stop assistance with product selection, installation instructions, and dismounting maintenance.
The knowledgeable staff at TFL Bearing is here to offer expert advice and tailored solutions if you have any issues about bearing selection, installation, or run into difficulties with particular operating circumstances. Visit the TFL Bearing official website now to explore our comprehensive product line and keep your equipment running smoother and longer!
Hello everyone, I am Jessica Jia, the author of this article.
As a Senior Account Manager at TFL BEARING, I have over eight years of experience in the bearing industry, specializing in market development and customer service. I excel at understanding the unique needs of different markets and crafting the most cost-effective bearing procurement solutions for our clients. During my time at TFL BEARING, I have successfully led and strengthened strategic partnerships with over 100 key international clients, helping them optimize their supply chains and enhance their value.
Leveraging our company's over 20 years of experience in bearing manufacturing and supply, we have consistently provided high-quality bearings to companies in more than 50 countries worldwide, establishing long-term partnerships with them. Our clients trust us to deliver industrial bearings that are durable, precision-engineered, and fully compliant with industry standards. Whether for medical, railway, automotive, or heavy machinery applications, our bearings are built to withstand demanding operating conditions, ensuring reliable performance and extended service life.
If you are looking for a reliable partner or need professional market advice, please do not hesitate to contact us. We offer one-stop solutions for your market.
Discover the best lubrication methods for ball bearings! Learn the pros and cons of grease and oil, proper application techniques, and common mistakes to avoid for optimal bearing performance and longevity....
Learn to identify bad ball bearing sounds (grinding, squeaking), diagnose lubrication or wear issues, and get step-by-step solutions to fix or replace them....
This article explores the design, functionality, and benefits of angular contact ball bearings, highlighting their ability to handle combined loads in high-speed industrial applications like robotics and automotive systems.
This comprehensive guide examines the unique geometry and benefits of thin-section bearings, highlighting their ability to reduce weight and save space in advanced machinery. It covers specific design types, load capacities, and essential maintenance tips for optimal performance.
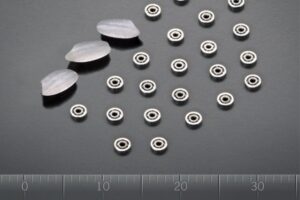
This article explores the essential characteristics, benefits, and applications of miniature ball bearings, offering a detailed guide on selecting the correct specifications for high-speed and compact precision machinery.
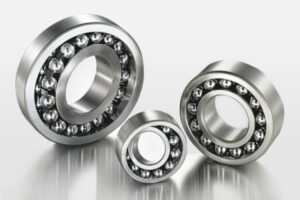
This guide explores the design and function of self-aligning ball bearings, highlighting their ability to accommodate angular misalignment in precision machinery. It covers load capacity, speed benefits, and selection criteria to help engineers ensure operational stability.