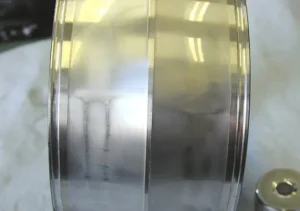
Profiles of the Three Main Culprits
Abrasive Wear – “The Grinder”
- Culprit Profile: External hard particles (dust, sand, metal debris) acting as an internal “grinding compound.”
- Modus Operandi: Continuously scratches and laps the smooth surfaces, progressively destroying the bearing’s precision and altering its internal clearance.
- Key Evidence: Dull surfaces covered in fine scratches.
Adhesive Wear – “The Seizure”
- Culprit Profile: The catastrophic breakdown of the lubricating film, causing metal surfaces to attack each other.
- Modus Operandi: A vicious cycle of micro-welding and tearing at the points of metal-to-metal contact under high heat and pressure. This leads to material transfer and severe surface damage, often resulting in a sudden, catastrophic failure.
- Key Evidence: Scuffing, scoring, and heat discoloration.
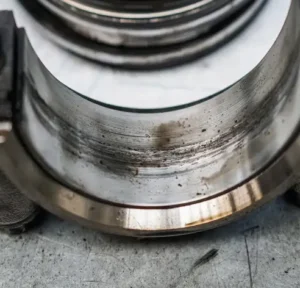
Corrosive Wear – “The Corroder”

- Culprit Profile: Moisture or chemical agents—the silent “chemical weapons.”
- Modus Operandi: Chemically reacts with the metal to form a brittle layer of rust. This rust is then crushed by the rolling elements, becoming an abrasive agent itself. This creates a compound failure mode of both corrosion and secondary abrasive wear.
- Key Evidence: Rust, pitting, and uniform dark gray staining.
The Field Investigation: A Diagnostic Guide
Before You Begin (The Golden Rules):
- Document Everything: Take photos at every stage of disassembly and inspection.
- Don’t Clean It!: The residual lubricant is crucial evidence.
- Wear Gloves: Prevent contamination from your hands and protect yourself.
| Diagnostic Clue | Abrasive Wear | Adhesive Wear | Corrosive Wear |
| Visual Appearance (Macro) | Surfaces are dull and matte, as if sandblasted. The rolling path is evenly “lapped.” | Surfaces show clear signs of scuffing and scoring, often accompanied by heat discoloration (blue, brown, black), indicating extreme temperatures. | Surfaces are covered in red rust or black oxide. In advanced stages, the entire raceway is darkened with pitting. |
| Feel & Smell (Grease) | Rubbing the grease between fingers reveals a distinctly gritty texture. The grease is often black or gray from metal particle contamination. | The grease is dry, carbonized, and hard, sometimes like a crust. There may be a sharp, burnt smell. | The grease is emulsified, appearing milky or yellow (from water), or reddish-brown (from rust). It might have a rancid or sour smell. |
| Surface Details (Micro) | Fine, parallel, hairline scratches are visible in the direction of rolling. The surface looks polished but has lost its reflective luster. | Evidence of material being “smeared” and “torn.” The surface is rough and uneven. Tiny welded metal beads may be visible. | Micro-pits from chemical reactions are visible. The edges of these pits are typically rounded, unlike the sharp edges of mechanical dents. |
Root Cause Analysis (RCA) & Actionable Solutions
Scenario 1: Diagnosis is [Abrasive Wear]
- Root Cause Checklist (Ask these questions):
- Seals? Are the seal lips worn, cracked, or hardened? Is the seal type appropriate for the environment (dust, liquid spray)?
- Environment? Is the equipment in a highly contaminated area (mining, cement, agriculture)?
- Lubrication Process? Are grease guns and oil cans clean? Is lubricant stored in sealed containers?
- Recent Maintenance? Was the housing and shaft cleaned before installation? Could debris have been introduced then?
- Solutions (For End-Users & Distributor Recommendations):
- Immediate Action: Thoroughly clean the shaft and housing. Ensure a clean installation environment.
- Medium-Term Improvement:
- (Distributor Opportunity) Upgrade the Sealing: Upgrade from a standard metal shield (ZZ) to a non-contact (LLB) or contact (2RS) rubber seal. For extreme contamination, recommend agricultural bearings with triple-lip seals or external labyrinth seals.
- Improve Lubrication Practices: Use dedicated, clean lubrication tools.
- Long-Term Strategy: Install protective covers on equipment. For oil-lubricated systems, upgrade the filtration.
Scenario 2: Diagnosis is [Adhesive Wear]
- Root Cause Checklist (Ask these questions):
- Right Lubricant? Does the grease/oil model match the speed and temperature requirements in the manual? Is the viscosity correct?
- Enough Lubricant? When was it last greased? Was the quantity correct (typically 1/3 to 1/2 of the bearing’s free space)?
- Running Too Hard? Has the machine been operated beyond its rated speed or load?
- Installation Issue? Is the internal clearance too small (e.g., wrong class)? Is the preload too high? Both lead to excessive heat.
- Solutions (For End-Users & Distributor Recommendations):
- Immediate Action: Check the equipment manual immediately to verify the correct lubricant type and re-lubrication interval.
- Medium-Term Improvement:
- (Distributor Opportunity) Recommend a High-Performance Lubricant: Based on the actual operating conditions, recommend a premium lubricant with the correct viscosity, base oil, and thickener (e.g., high-temperature polyurea grease, high-speed synthetic oil).
- Check Installation Parameters: Measure the shaft and housing to ensure fits are correct. If applicable, re-calibrate the preload.
- Long-Term Strategy: Implement a formal lubrication management program with defined schedules, quantities, and quality checks.
Scenario 3: Diagnosis is [Corrosive Wear]
- Root Cause Checklist (Ask these questions):
- Wet Environment? Is the bearing exposed to water, steam, or corrosive fluids?
- Long Downtimes? Does condensation build up inside during shutdowns?
- Bare Hands? Was the bearing handled without gloves during installation?
- Wrong Cleaner? Was a corrosive solvent used to clean the components?
- Solutions (For End-Users & Distributor Recommendations):
- Immediate Action: Improve water shielding around the equipment. Enforce a strict “gloves-on” policy for installation.
- Medium-Term Improvement:
- Use a grease with enhanced rust and corrosion inhibitors.
- For idle equipment, periodically rotate the shaft to recoat surfaces with grease.
- Long-Term Strategy:
- (Distributor Opportunity) Upgrade the Bearing Material: Where corrosion is unavoidable, recommend 440C stainless steel bearings. For extreme chemical exposure, full ceramic or hybrid ceramic bearings are the ultimate solution.
Expert Tip: Wear Modes Rarely Act Alone
In the real world, wear modes are often interconnected:
- Corrosion creates pits that act as stress risers, initiating Fatigue.
- Corrosion flakes off rust particles that act as an abrasive, causing Abrasive Wear.
- Abrasive Wear ruins the surface finish, making the bearing more susceptible to Adhesive Wear.
Therefore, a good diagnostician acts like a detective to find the initial culprit to truly solve the problem.
Reading the Past to Predict the Future
Analyzing the wear marks on a failed bearing is, in essence, fixing a problem after it has occurred. But its true value lies in preparing for the future. The knowledge we gain from a piece of worn steel today directly translates into the wisdom that prevents equipment failures tomorrow. By understanding the methods of the three main culprits—abrasion, adhesion, and corrosion—we can more effectively improve seals, optimize lubrication, and control the operating environment, thereby stopping a potential failure before it even begins.