What Is Fatigue? – The Paperclip Analogy
Imagine bending a paperclip back and forth. The first few times, nothing seems to happen. But after dozens of repetitions, it will suddenly snap, seemingly without much effort.
This is metal fatigue. A bearing’s raceways and rolling elements withstand enormous, repetitive pressure on a very small contact area. Each rotation is like one “bend” of the paperclip. After hundreds of millions of cycles, the material’s internal microstructure degrades, cracks form, and eventually, pieces of the surface flake off. This flaking is called Spalling.
The Normal Lifecycle – Four Stages of Fatigue Spalling
In an ideal world—clean, well-lubricated, and correctly installed—a bearing’s fatigue process is slow and natural:
Stage 1: The Hidden Danger – Subsurface Crack
It all begins beneath the surface. Because the maximum stress occurs slightly below the raceway surface (about 0.1 mm deep), the first micro-cracks are born inside the material, invisible to the naked eye. At this stage, the bearing runs perfectly.
Stage 2: Crack Propagation – The Journey to the Surface
Under continued stress cycles, the internal crack begins to grow towards the surface and spread, like a tunnel being dug. Sometimes, lubricant is forced into the crack under high pressure, which can accelerate its growth (a hydraulic effect).
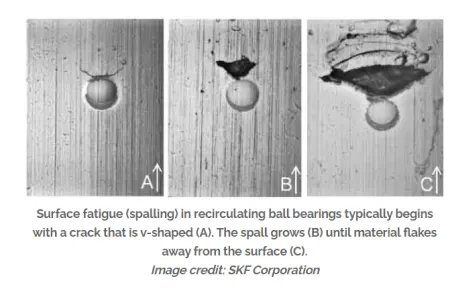
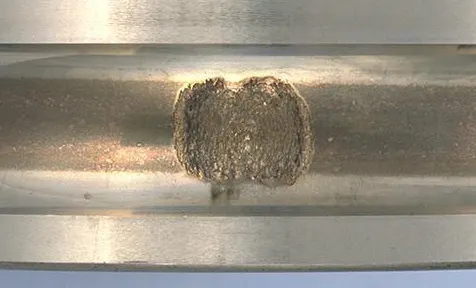
Stage 3: Initial Spalling – The First Pit
When the crack finally reaches the raceway surface, a small piece of metal flakes off, creating an initial pit, or “spall.” This is the first visible sign of fatigue. The bearing may start to produce a slight noise at this point.
Stage 4: Widespread Spalling – The Chain Reaction of Failure
Once the first spall appears, the situation deteriorates rapidly.
- Stress Concentration: The sharp edges of the spall become new points of high stress.
- Secondary Damage: The metal debris from the spall acts like a grinding paste, getting crushed repeatedly inside the bearing and causing more scratches and dents.
- Chain Reaction: Every time a rolling element passes over the spall, it creates an impact, which quickly generates more cracks and larger areas of spalling around it. Eventually, the raceway becomes severely damaged, and the bearing fails with loud noise and intense vibration.
The Accelerants – What Causes Premature Spalling?
A bearing’s normal fatigue life should be very long. If it fails from spalling long before reaching its calculated life, it’s because certain “accelerants” were involved. Electrical erosion is one of the most hidden and aggressive of these.
Electrical Erosion – The Deadly Spark
- Cause: When an electric current (especially shaft currents from VFD motors) passes through a bearing, it can create an arc across the thin oil film between the rolling element and the raceway.
- Process:
- Micro-Craters: Each tiny spark acts like a micro-weld, instantly melting a microscopic spot of metal. This leaves behind a tiny, hardened crater on the smooth raceway.
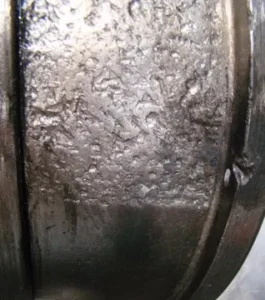
- “Fluting” Formation: Continuous arcing creates countless craters, sometimes forming a distinctive washboard-like pattern known as “fluting.”
- Fatigue Trigger: Each one of these millions of tiny craters is a perfect stress concentration point. It’s like carving thousands of scratches into the paperclip before you start bending it. This drastically shortens the crack initiation phase, causing spalling to occur alarmingly early.
Contamination – The “Sandpaper” Inside
When hard particles (like dust or metal shavings) enter a bearing, they get pressed into the raceways, creating dents. The edges of these dents are also stress concentration points where fatigue cracks love to start.
Poor Lubrication – The Missing Cushion
If the lubricant film is too thin or breaks down, it allows microscopic metal-to-metal contact between the surfaces. This causes surface distress and micro-cracks that can quickly grow into spalls.
Improper Installation – The Built-in Flaw
An excessively tight fit or misalignment between the shaft and housing creates abnormally high internal stresses. This overloads certain areas of the bearing, rapidly consuming its fatigue life.
Diagnosis and Prevention – How to Extend Bearing Life
Fighting premature spalling is all about eliminating these “accelerants.”
- Prevent Electrical Erosion: For applications driven by VFD motors, always consider shaft currents. Using insulated bearings, hybrid (ceramic) bearings, or installing grounding brushes are effective ways to eliminate the problem.
- Keep It Clean: Using high-quality sealed bearings and installing them in a clean environment is the first line of defense against contaminants.
- Lubricate Correctly: Choose the right lubricant for your operating conditions and follow a proper re-lubrication schedule to ensure the oil film is always effective.
- Install with Precision: Use professional tools and follow correct installation procedures to ensure the fits and alignment are within specifications.
- Condition Monitoring: Using vibration analysis can detect the signs of failure in its very early stages (sometimes even at the subsurface crack stage). This gives you valuable time to plan a replacement and avoid a catastrophic shutdown.
Hands-On Troubleshooting: How to Diagnose Spalling and Its Cause
When a bearing fails, simply replacing it is not enough. If you don’t find the root cause, “history” will soon repeat itself. Performing a “post-mortem” on a failed bearing is the key to preventing future failures.
Preparation Before Inspection:
- Do Not Clean: Don’t wash the bearing before inspection. The color of the remaining grease and the shape of metal flakes are important clues.
- Get Your Tools: Prepare clean gloves, a magnifying glass (10x or higher), and a camera.
- Record Information: Note the bearing’s mounting position, operating hours, working environment, lubrication intervals, etc.
Troubleshooting Steps and Clues:
Step 1: Macro Inspection – Look at the Location and Pattern of Spalling
| Observed Phenomenon | Possible Root Cause | Further Investigation Clues |
| Spalling is on one side of the raceway, with a distinct, polished wear band. | Improper Installation (Misalignment) | If the spalling is on the inner ring, the shaft may be bent. If it’s on the outer ring, the housing bores may be misaligned. The ball path will be clearly off-center. |
| Spalling is evenly distributed around the raceway in a band, and the pits have regular spacing. | Normal End of Fatigue Life | Check if the operating hours are close to or have exceeded the calculated service life. If there are no other unusual signs, this is likely a normal “end-of-life” failure. |
| Multiple, evenly spaced dents are on the raceway, and spalling starts from these dents. | Incorrect Installation (Hammering) or Shock Load | If the dent spacing matches the rolling element spacing, it’s likely that the wrong ring was struck with a hammer during mounting, causing impact forces to travel through the rolling elements. |
| The spall is very deep, and its edges have a bluish or brownish color (tempering). | Severe Lack of Lubrication | The raceways and rolling elements may appear dark or discolored. The remaining grease may be dry and black. This is evidence of high temperatures from metal-to-metal contact. |
| The raceway is covered in dense, tiny pits, creating a dull, gray, “washboard” texture, with spalling on top. | Electrical Erosion (Fluting) | This is the classic signature of electrical damage! Under a magnifying glass, you can see countless micro-craters. This failure is very common in equipment driven by VFDs. |
Step 2: Micro Inspection – Look at the “Skin” of the Raceway
Use a magnifying glass to carefully examine the unspalled areas of the raceway for early clues:
- Denting: If you see many small pits pressed into the raceway by hard particles, then contamination is the primary issue. You need to check the effectiveness of the seals, the cleanliness of the lubricant, and the work environment.
- Scratching: Fine scratches or scuffing on the raceway surface could mean the lubricant film strength is too low or soft contaminants are present in the lubricant.
- “Water Marks” or Discoloration: This could be a sign of rust from water ingress or chemical breakdown of the lubricant.
Step 3: Overall Diagnosis – Connect the Clues
A single clue may not be enough. You need to combine all the evidence.
- Case Study: A fan bearing failed prematurely. Upon disassembly, we found:
- The raceway had a gray, “washboard” texture. (Clue 1: Strongly indicates electrical erosion)
- The spalling initiated from this “washboard” area. (Clue 2: Erosion accelerated the fatigue)
- The equipment was controlled by a VFD. (Clue 3: The source of the electricity)
- Conclusion: The root cause was electrical erosion caused by shaft currents from the VFD, leading to premature fatigue spalling.
- Solution: Replace with an insulated bearing or install a grounding brush on the motor shaft.
It Starts Within, but Ends with Prevention
Bearing fatigue spalling is an irreversible process that begins in a microscopic world. While it is the natural end for every bearing, we can absolutely prevent the tragedy of premature failure by eliminating deadly “accelerants” like electrical erosion and contamination, and by using scientific monitoring techniques. More importantly, by mastering the methods of failure analysis, we can learn from every failure, find the root cause, and make improvements to achieve truly long-term, reliable operation of our equipment.